Forum Replies Created
-
 AdminKeymaster2 months, 4 weeks ago in reply to: How to Change IP (if i change VPS) in WP7 #5537
To do this, you need to do the correct sequence of actions.
1. Register its IP address on the first VPS server.
2. Install Privat 7 on the second VPS server and register its IP address. There will be a list of two IP addresses, namely the first VPS and the second VPS.
3. Install Privat 7 on the third VPS server and register its IP address. There will be a list of three IP addresses already
4. Install Privat 7 on the fourth VPS server and register its IP address. There will be a list of four IP addresses already
You cannot register all four IP addresses on a single VPS serverAdminKeymaster3 months, 1 week ago in reply to: Step-by-Step Guide: Registering in the Web Portal #5528Personal Account Registration
Step #1 Registration of a personal account is carried out on the website by following the link: https://my.westernpips.com/register
Step #2 To register, you will see a form to fill in the details:

Step #3 Please fill in the relevant information for correct registration

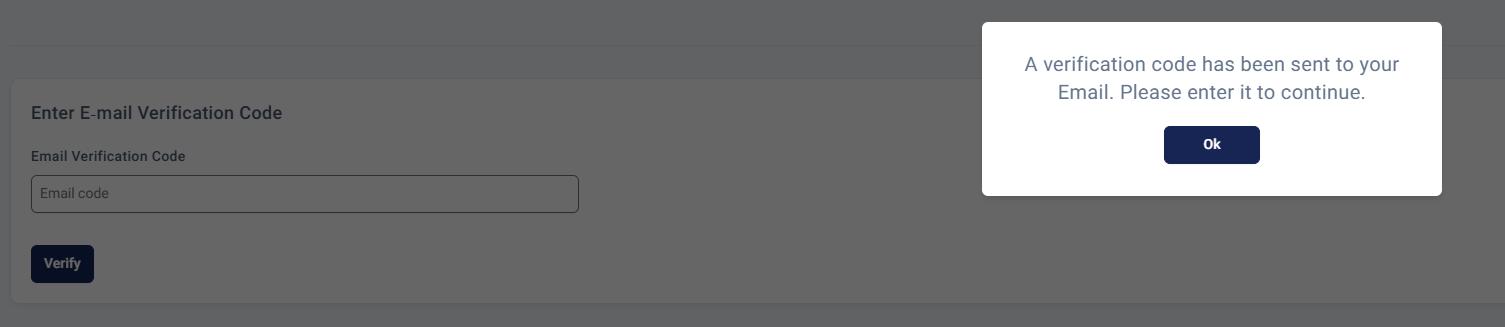
Step #4 After clicking on the registration button, you will receive a verification code by email, which you need to enter in the appropriate field.
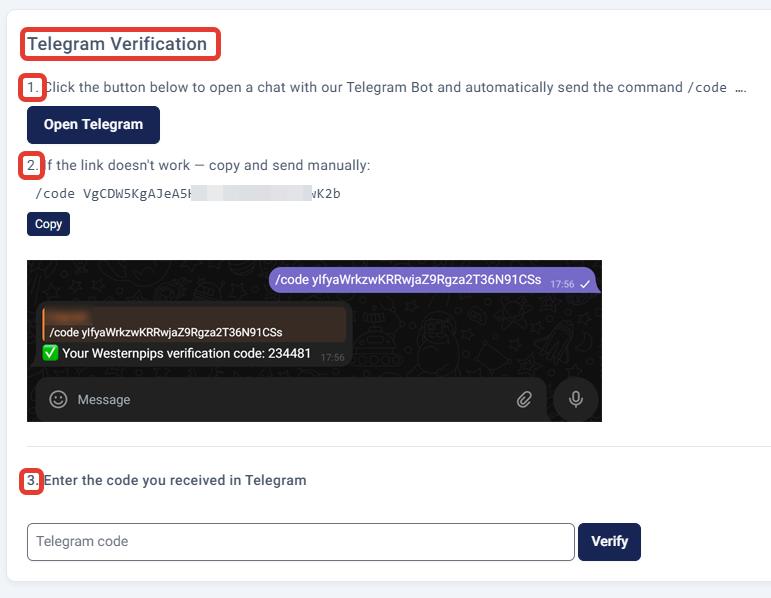
Step #5 After that, you need to verify your Telegram account. Use the 3 hint sections for this:
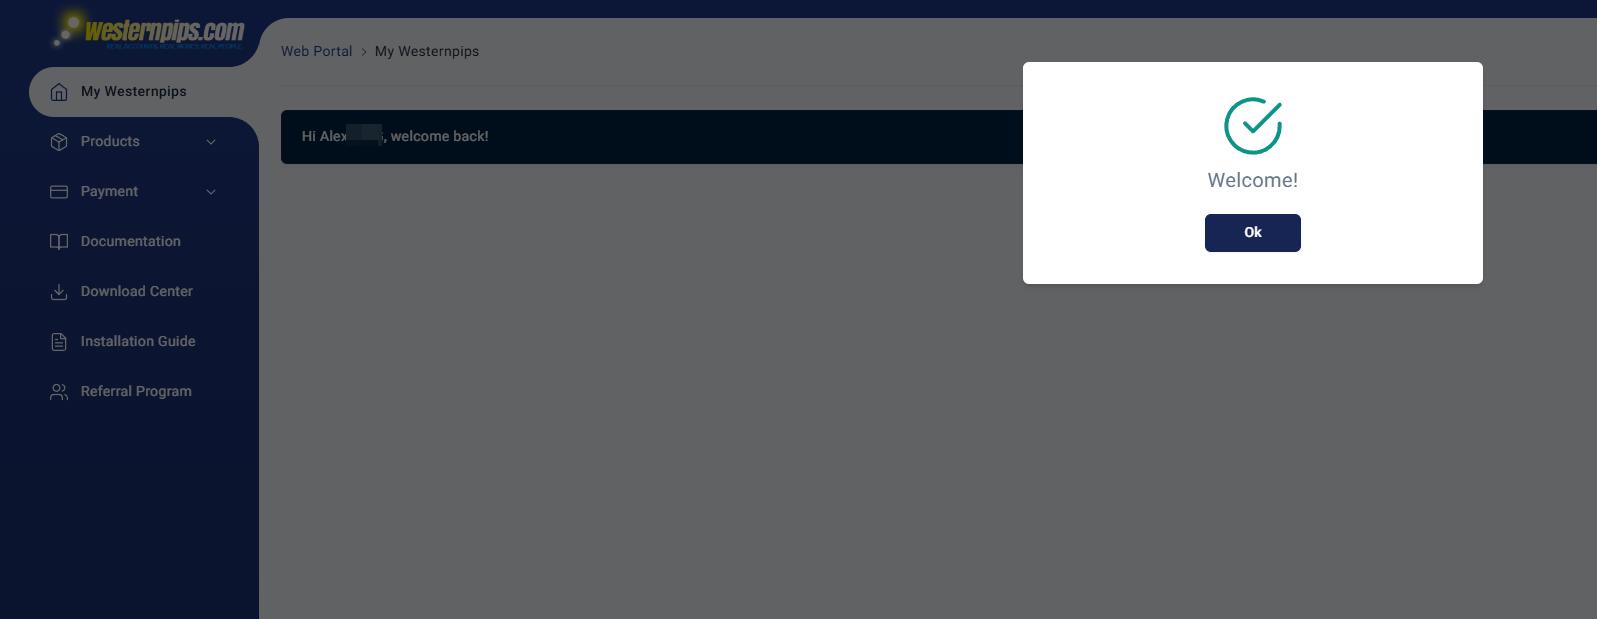
Step #6 Registration completed. You will see a message like this:

Step #7 Next, enter your email address and the password you provided during registration.
Step #8 That’s all, you are registered in your personal account
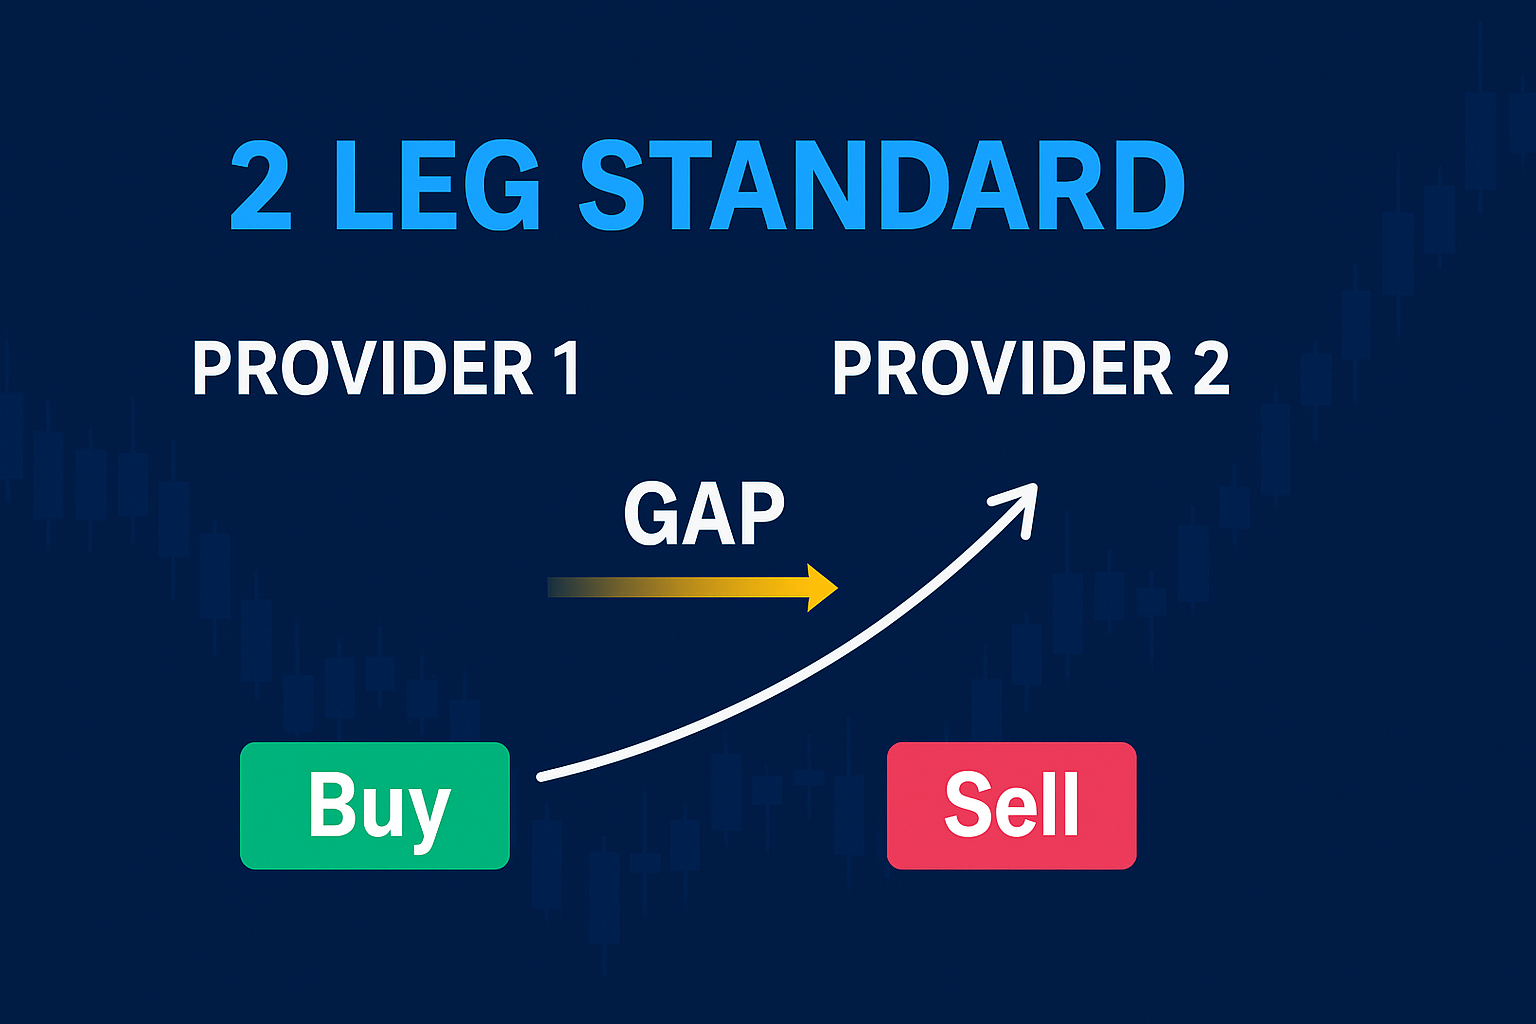
AdminKeymaster3 months, 2 weeks ago in reply to: Two Leg Standard Algo #5499🔄 TwoLegStandard Algorithm — Classic Dual‑Provider Latency Arbitrage Strategy
🧠 Smart Trading Between Two Independent Quote Feeds
TwoLegStandard is Westernpips Private 7’s time‑tested arbitrage strategy designed to exploit short‑lived price discrepancies between two independent quote providers (typically two brokers or two connections to the same broker). Unlike one‑leg tactics, TwoLegStandard opens simultaneous Buy and Sell positions on the same symbol across two accounts, creating an instant hedge with zero market exposure at entry. The strategy then manages exit conditions to lock in profits as prices realign.
________________________________________
⚙️ How the Strategy Works
Dual Quotes – The algorithm streams Bid/Ask prices for the same instrument from Provider 1 and Provider 2.
Price Comparison – It compares these quotes, applying an optional auto‑ or manual shift to align the feeds.
Signal Detection – When a predefined threshold (OpenGapPt or OpenBasketPt) is exceeded, an entry signal is generated.
Hedged Entry – Two opposing trades are opened instantly:
• Buy on Account A (Provider 1)
• Sell on Account B (Provider 2)
Lock Mode – Both legs are held for at least MinLockDurationSecs to avoid noise‑based exits.
Smart Exit – Positions close when one of the following triggers fires:
• Take Profit (TP) – target profit from gap convergence
• Stop Loss (SL) – preset loss cap
• Close Gap – reverse price divergence
• Smart Close – TP adjusted for slippage________________________________________
🚀 Dual Entry Options: GAP & Basket
• Gap Arbitrage – Fires on instantaneous Bid/Ask divergence between providers.
• Basket Arbitrage – Uses a calculated profit spread (basket) based on initial vs. current quotes, ideal for calmer markets.________________________________________
🔐 Lock Mechanism
After entry, a mandatory hold (“Lock”) minimizes premature exits. TwoLegStandard also features a multi‑slot architecture, allowing multiple independent trades to run concurrently.
________________________________________
🎯 Key Benefits
✅ Pure arbitrage between two live quotes of the same instrument
✅ Instant hedged Buy/Sell execution on separate accounts
✅ Supports both Gap and Basket entry logic
✅ Flexible exits: TP, SL, Close Gap, Smart Close
✅ Auto or manual quote shift calibration
✅ Multi‑slot engine for parallel trading
✅ Works with FIX, MT4, MT5, cTrader connectors________________________________________
📈 Who Should Use TwoLegStandard?
This strategy is ideal for professional traders managing two brokerage accounts or quote feeds. It delivers hedged entries, intelligent trade management, and resilience in volatile conditions—perfect for:
Dual‑broker setups seeking latency edges
VPS or colocation deployments
Traders who demand refined signal filtering and risk control________________________________________
✅ Purpose
TwoLegStandard combines the reliability of classic two‑leg arbitrage with modern execution intelligence, letting you capitalize confidently on micro‑latency and fleeting market inefficiencies.
AdminKeymaster3 months, 2 weeks ago in reply to: One Leg Hidden Algo #5488🔹 OneLegHidden Algorithm – Advanced Dual-Broker Latency Arbitrage with Hidden Entry
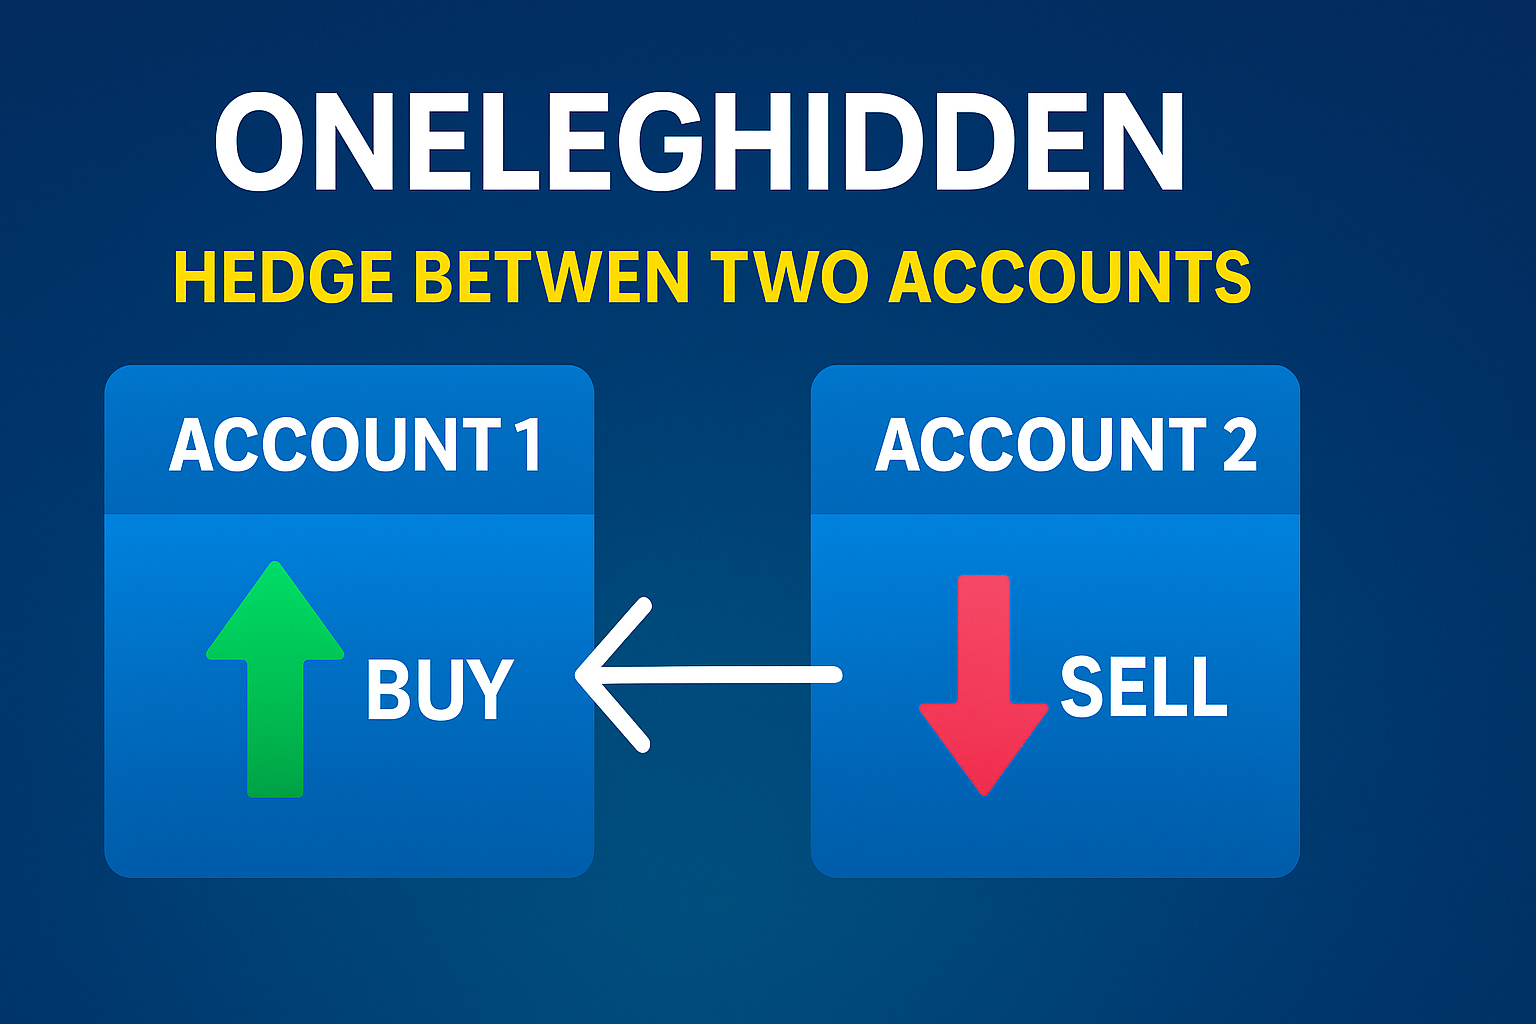
🔒 Smart Arbitrage Execution with Hidden Exposure
In modern high-frequency trading, success depends on more than just speed — it requires precision, stealth, and the ability to operate across multiple brokers without leaving a trace. The OneLegHidden algorithm in Westernpips Private 7 is specifically designed for these conditions. It enables traders to execute advanced latency arbitrage strategies using two separate trading accounts — while remaining fully hidden from detection.
At the core of the strategy is a dual-leg entry mechanism. When the system detects a price discrepancy (gap) between a Fast provider and a Slow or Signal provider, it does not enter the market immediately with an exposed order. Instead, OneLegHidden opens two offsetting positions — a Buy on one account and a Sell on another. This creates a fully hedged, market-neutral state that eliminates directional risk at the moment of entry.
Once the hedge is in place, the algorithm continuously monitors market conditions in real time. As soon as a confirmed arbitrage opportunity appears — such as a Fast quote outpacing the Slow by a set number of points — OneLegHidden closes one side of the hedge, leaving the other side open to capture profit. This hidden approach masks the intention of the trade, reducing the chances of detection by broker-side plugins or liquidity providers sensitive to toxic flow.
The algorithm operates across multiple independent slots, meaning it can track and manage several trading opportunities in parallel. It uses intelligent filters for gap size, spread control, quote alignment, and time delays between entries. The strategy also supports Close Gap logic, where trades are automatically closed when the opposite arbitrage signal appears, as well as Trailing Stop functionality for maximizing profits once the trade moves in your favor.
With full control over execution settings — including provider delays, quote shifting, slippage tolerance, and per-account trade routing — OneLegHidden is ideal for traders who need to stay hidden, fast, and flexible. It’s particularly effective in environments where direct arbitrage is blocked or filtered and offers a powerful toolset for bypassing traditional anti-HFT mechanisms.
________________________________________⚙️ How It Works (Summary Logic):
Receives real-time quotes from Fast and Slow/Signal data feeds.
Calculates directional gaps (Buy/Sell) between providers.
Applies filters for spread, delay, quote shift, and timing.
If both Buy and Sell gaps meet conditions:
Opens Buy order on Account A
Opens Sell order on Account B
Waits for arbitrage signal confirmation.
Closes one side of the hedge (Buy or Sell), depending on which gap signal activates first.
Leaves the remaining position open for profit.
Closes the trade later by:
Take Profit or Stop Loss
Reverse gap (Close Gap logic)
Trailing Stop
________________________________________🎯 Key Benefits of OneLegHidden:
True hidden arbitrage across two brokers
Simultaneous Buy/Sell hedging to neutralize exposure
Stealth execution to avoid broker plugin detection
Custom account routing (Buy and Sell on different accounts)
Multi-slot engine for parallel signal processing
Close Gap & Trailing Stop logic for smart exit handling
Shifter & Mixer modules to fine-tune quote latency alignment
________________________________________✅ Purpose
OneLegHidden is a professional tool for real traders who know that milliseconds matter — but stealth matters more. Whether you’re bypassing broker limitations, hiding your trading intent, or executing arbitrage on two different platforms — this algorithm gives you the control, speed, and invisibility you need.
-
This reply was modified 3 months, 2 weeks ago by Admin.
-
This reply was modified 3 months, 2 weeks ago by Admin.
-
This reply was modified 3 months, 2 weeks ago by Admin.
-
This reply was modified 3 months, 2 weeks ago by Admin.
-
This reply was modified 3 months, 2 weeks ago by Admin.
-
This reply was modified 3 months, 2 weeks ago by Admin.
-
This reply was modified 3 months, 2 weeks ago by Admin.
-
This reply was modified 3 months, 2 weeks ago by Admin.
AdminKeymaster4 months, 3 weeks ago in reply to: How to save settings and connections when reinstalling WP7 #5436Decision:
1. In order to save all the connection settings and algorithms, you need to follow this path:
C:\Program Files\Westernpips Private 7\.cfg
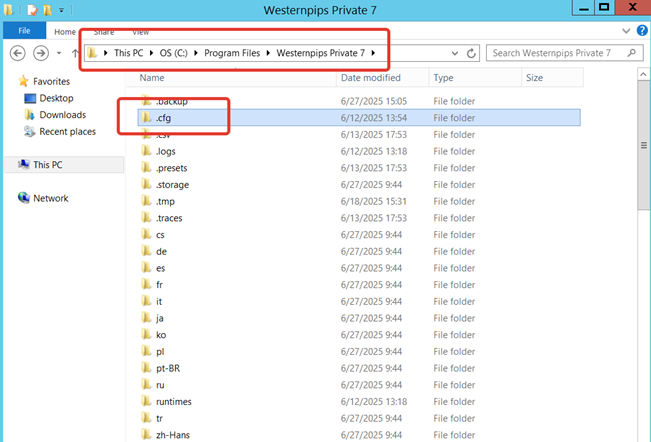
2. Save this folder. Archive it in RAR and transfer it to a new VPS server.
3. Install the latest version of Privat 7 on the new VPS.
4. Unzip the RAR archive and move the entire folder to the same path:
C:\Program Files\Westernpips Private 7\.cfg5. Copy everything and replace the files. Start Private by registering a new IP address
6. That is all. You have moved all your connectors and algorithms to a new server.
AdminKeymaster4 months, 3 weeks ago in reply to: Strategy Back Tester #5427BackTest XAUUSD
The most important strategy to find the best and most profitable settings of any strategy based on the recorded ticks.What you need to do to get a high-quality set to work on a live account:
1. Record quotes of the traded symbol
2. Launching a “trial” trading on a real account
3. Preparing the Backtest strategy for launch
4. Work on creating a set
This is a roadmap for creating a working set. If you have done everything according to the instructions, but the profit does not go to the broker, then most likely the broker’s conditions do not allow you to trade with the arbitration system.
1. Record quotes of the traded symbol
To start recording quotes, check the Save Track to File box in the selected strategy and run it (you can do it without trading permission). We recommend recording an entire trading session, and at least 3 days for a better result.

After launching the strategy, quotes will be automatically recorded in a separate file with the name of the strategy that you are recording. When the required time is recorded, stop the strategy and now you can move on to the next points.
2. Launching a “trial” trading on a real account
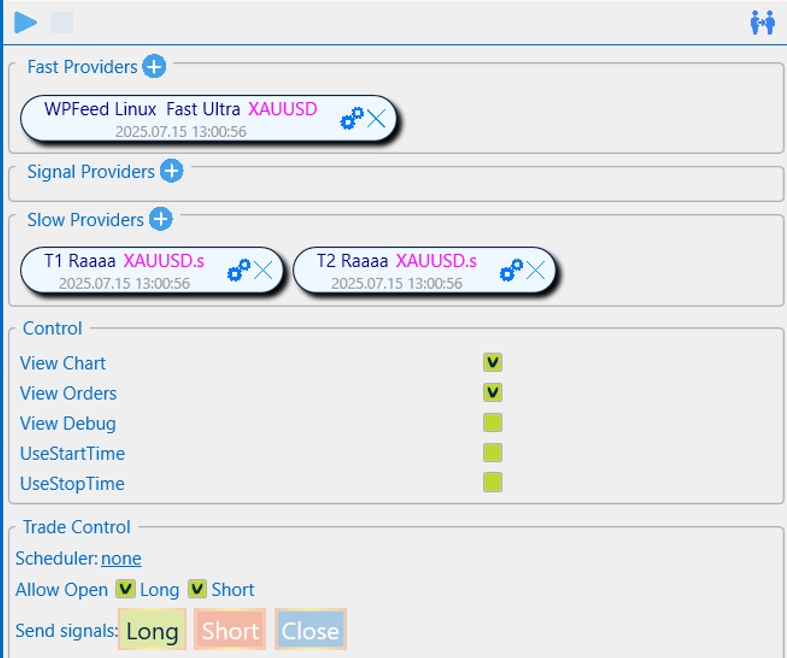
Launch the strategy on a live account with the desired symbol, allow trading, and be sure to add the View Orders checkmark.
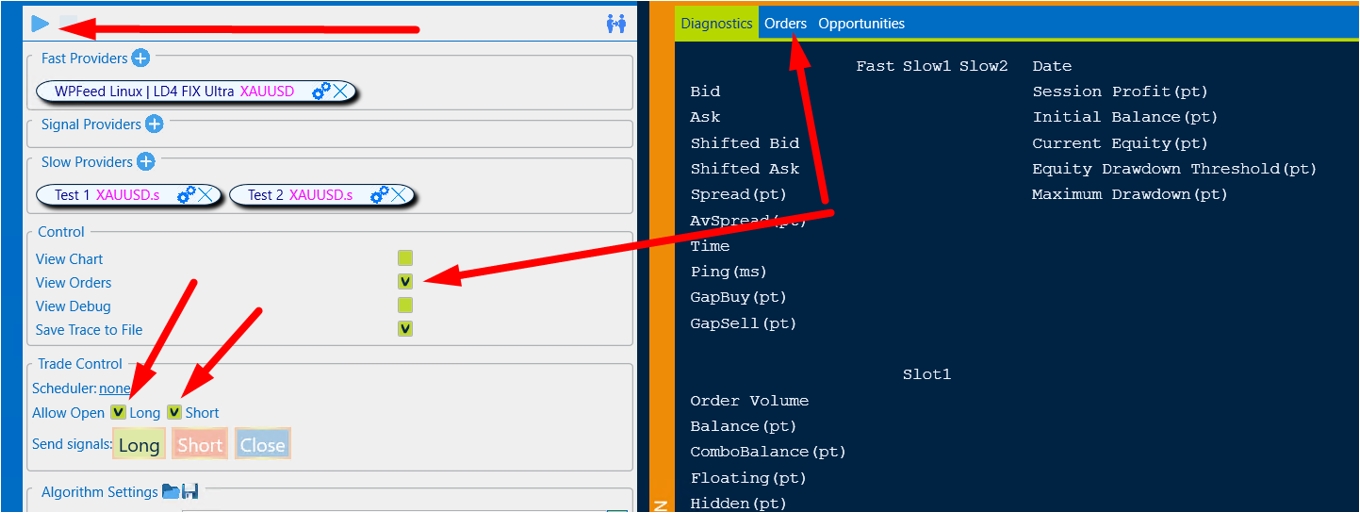
It is important to check the lot size before launching on a real strategy (always conduct tests with a minimum), the size of the chip should be small for a set of statistics.
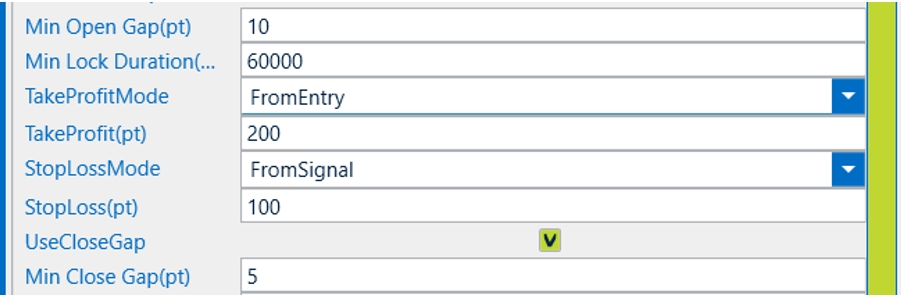
For example, to test on Gold (XAUUSD), you can use the following “Basic” settings:
To test on Gold:
- Open gap = 10;
- Close the gap = 5;
- Take profit = 200;
- Stop loss = 100.
We are waiting for 5-10 transactions to be executed. Then Stop the strategy and go to the Orders section.
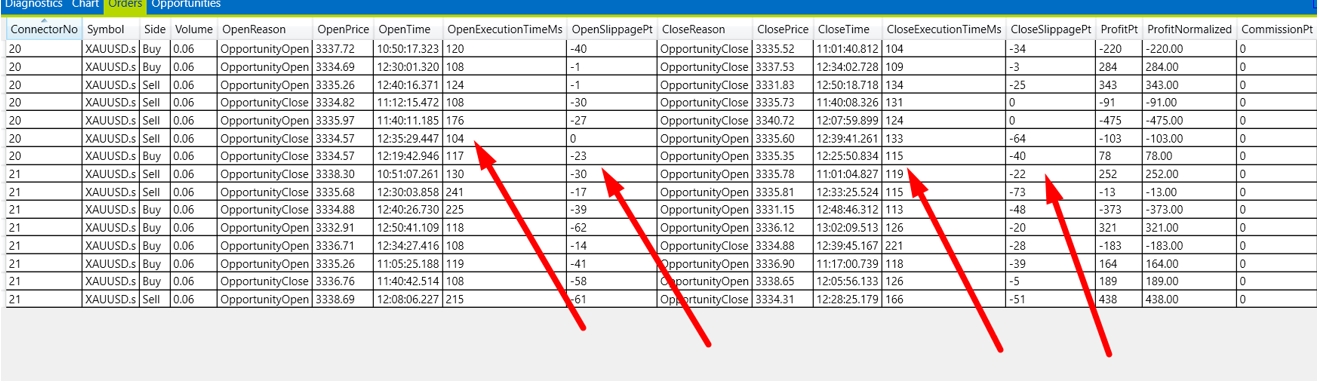
Important parameters for the Backtest that need to be recorded:
- average OpenExecutionTime, in this case, you can record 120ms;
- average CloseExecutionTime, in this case, you can record also 120ms;
- average OpenSlippagePT in this case, you can record 30pt;
- average CloseSlippagePT in this case, you can record also 30pt.
It is also important to pay attention to the number of open/closed transactions with a slip = 0. In our case, we can safely put a 20% probability in the Backtest.
Now we have all the data to start creating a working set.
3. Preparing the Backtest strategy for launch
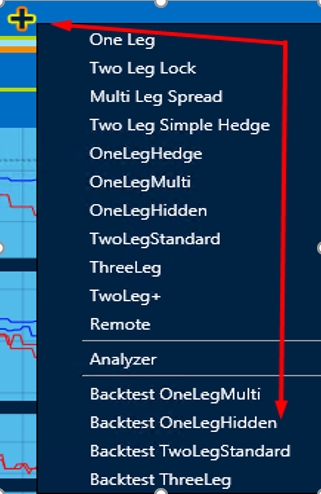
To do this, click and select the hidden history testing strategy click and choose the Backtest OneLegHidden strategy:
Next, the following actions will be required:
- downloading previously recorded quotes for Fast Providers;
- loading previously recorded quotes for Slow provider.
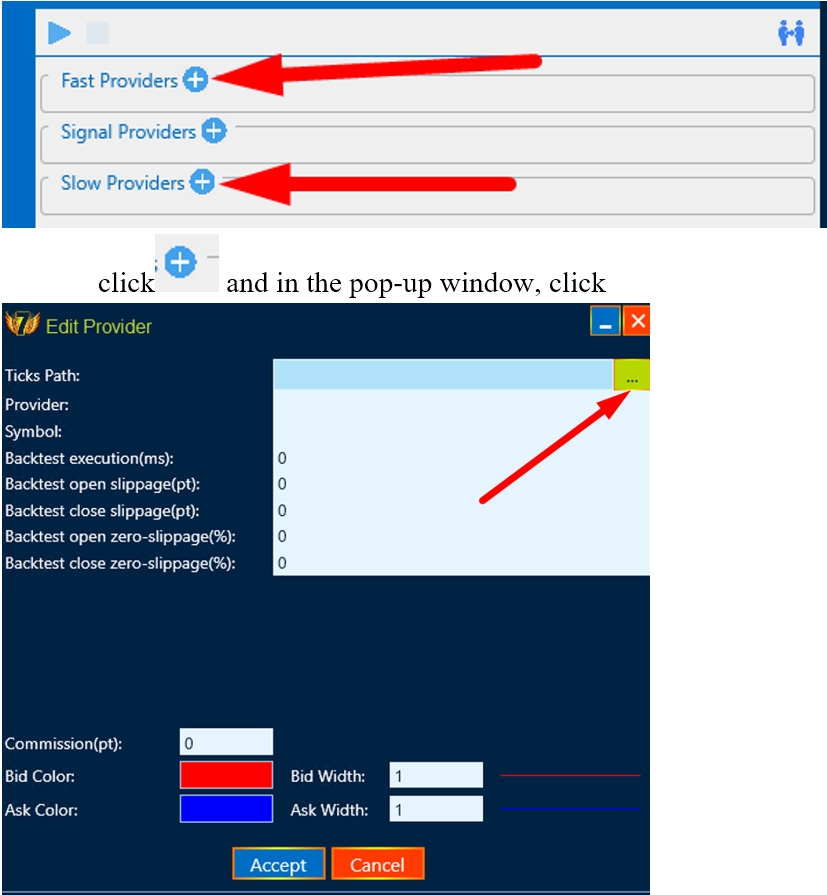
we choose a strategy whose quotes were recorded:
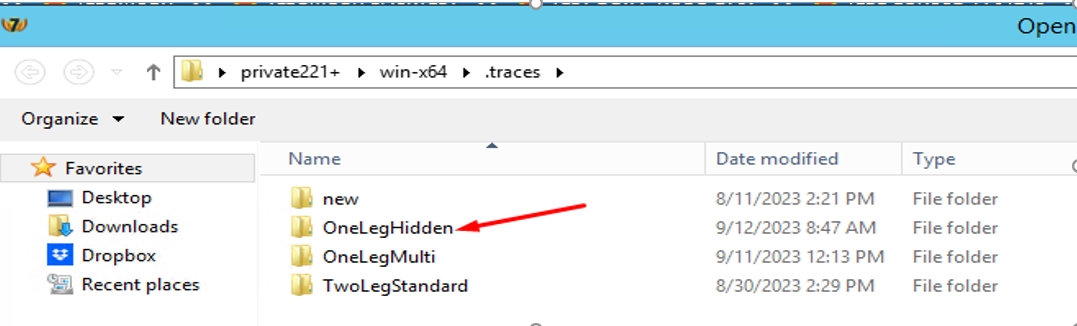
And we select quotes step by step for Fast providers, and then for Slow providers:
It is necessary to set the data that we received from testing on a real account in the settings of the slow provider. As we remember, we recorded the opening and closing of a deal as =120ms, the slip = 30pt, and the probability of opening/closing a deal with a slip = 0 is 20%.
We fill in this data in the settings of BOTH brokers (we do the same if the broker is the same)
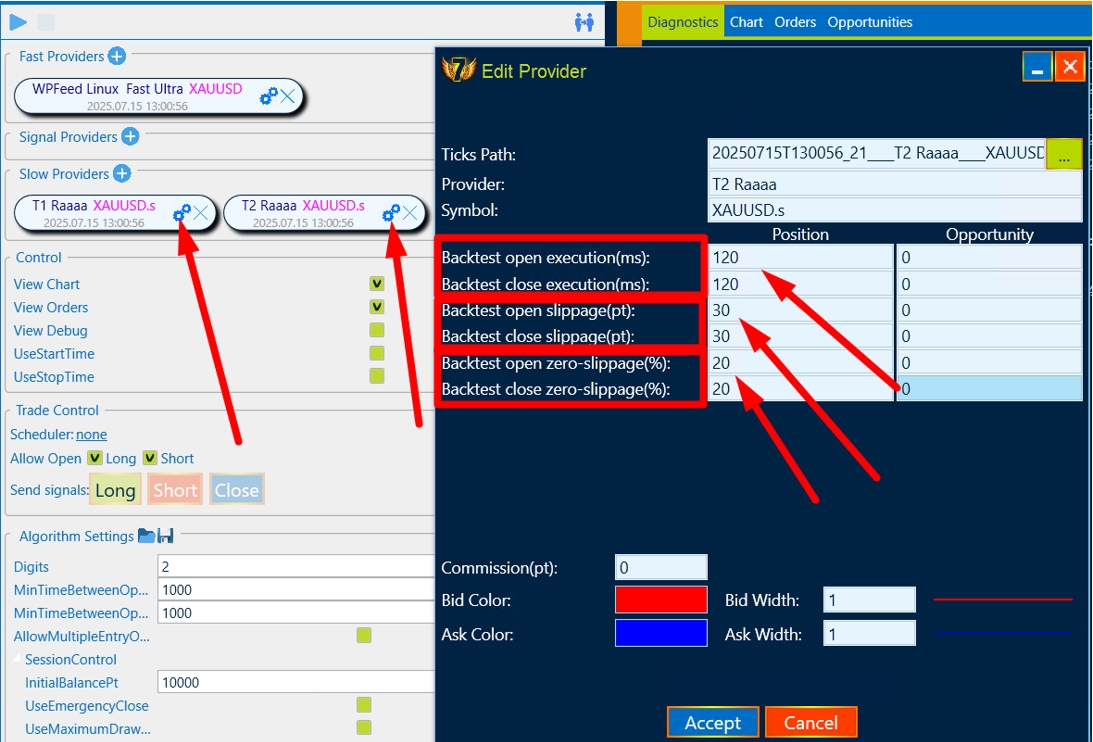
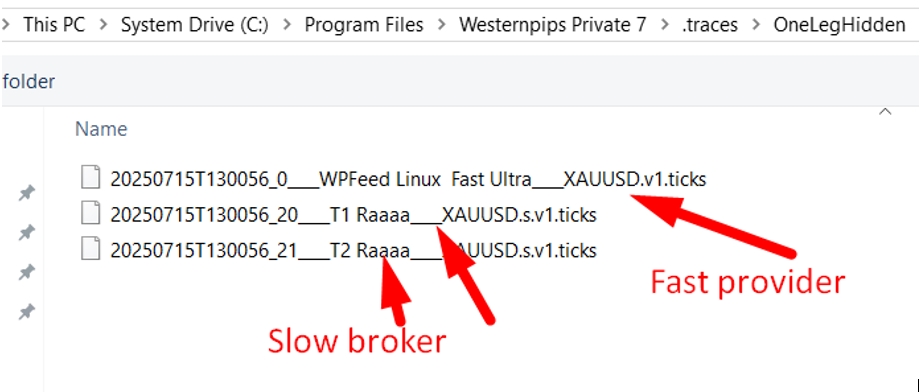
Please note that the OneLegHidden strategy requires 2 “slow” brokers and 1 “fast” broker, so there will be 3 entries in total.
If the quotes are loaded correctly, the following type of program will appear:
We can start testing with the “Basic” settings:
- Open a gap = 10;
- Close the gap = 5;
- Take profit = 200;
- Stop loss = 100.
4. Work on creating a set
After preparing the strategy, click start and wait for the result.

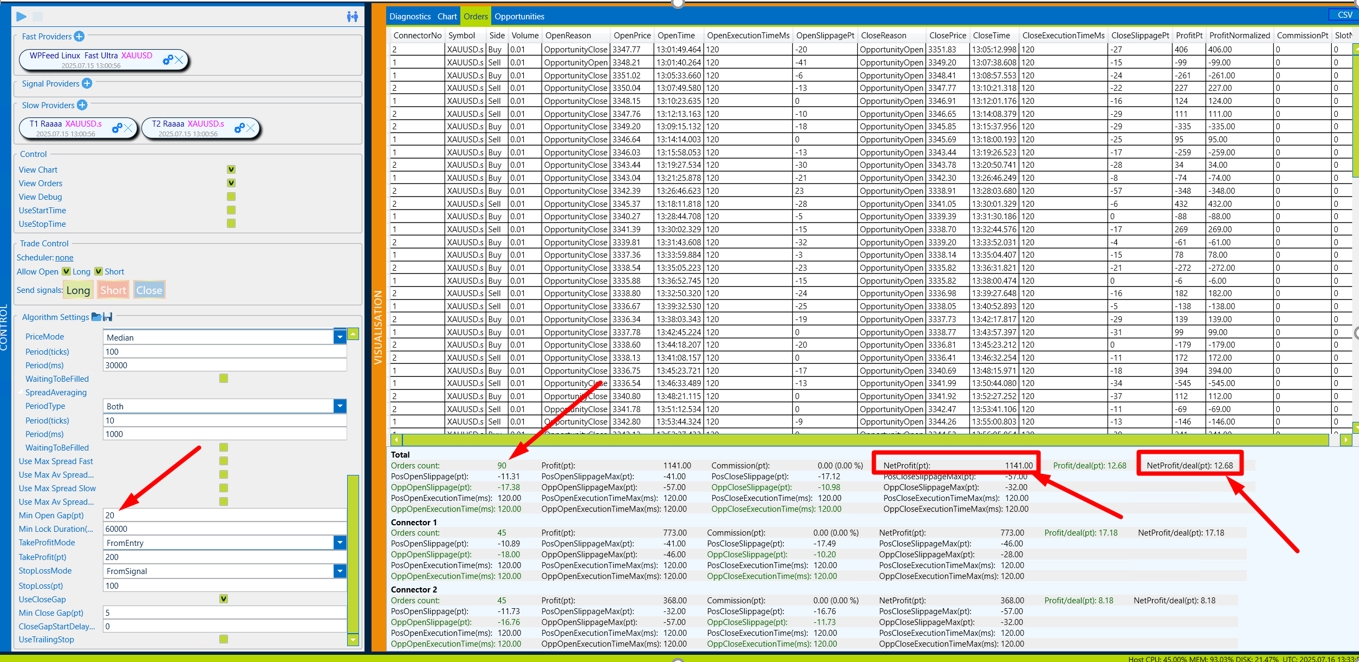
We recommend that you configure the set in the Orders section:

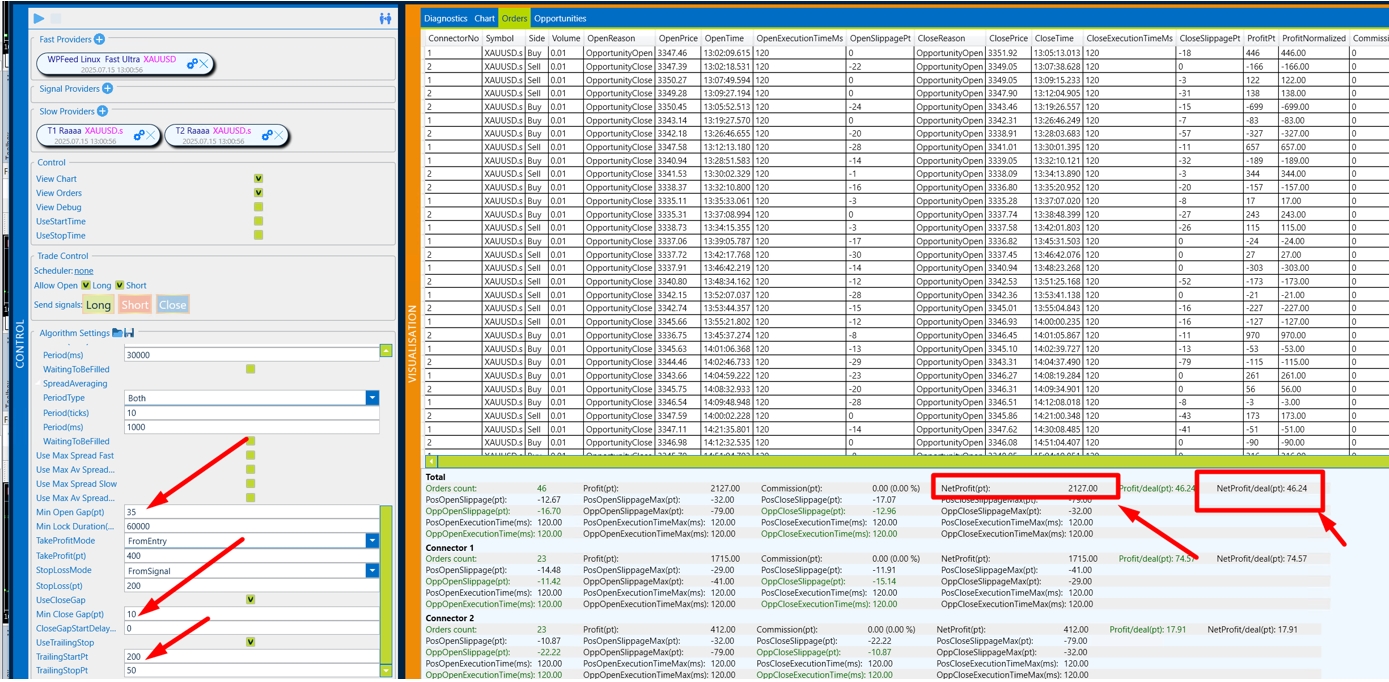
The most important parameters of:
- NetProfit/deal (pt) – shows the average profit per transaction, taking into account all profitable transactions and unprofitable ones.
- NetProfit(pt) – total profit with current settings
Please also note that the data that we entered into the backtest is now fully reflected in the Backtest- Open/CloseExecutionTime, Slippage and the probability of slipping = 0 is approximately 20%. This is the right testing strategy.
Now our task is to increase the profit on the transaction and the final profit.
The first is to upgrade OpenGap by 10 and let’s start the strategy again.
We see that the profit per transaction has become higher, the total profit has also increased and the number of transactions has decreased.
We raise it by 10 more OpenGap and let’s start the strategy again.
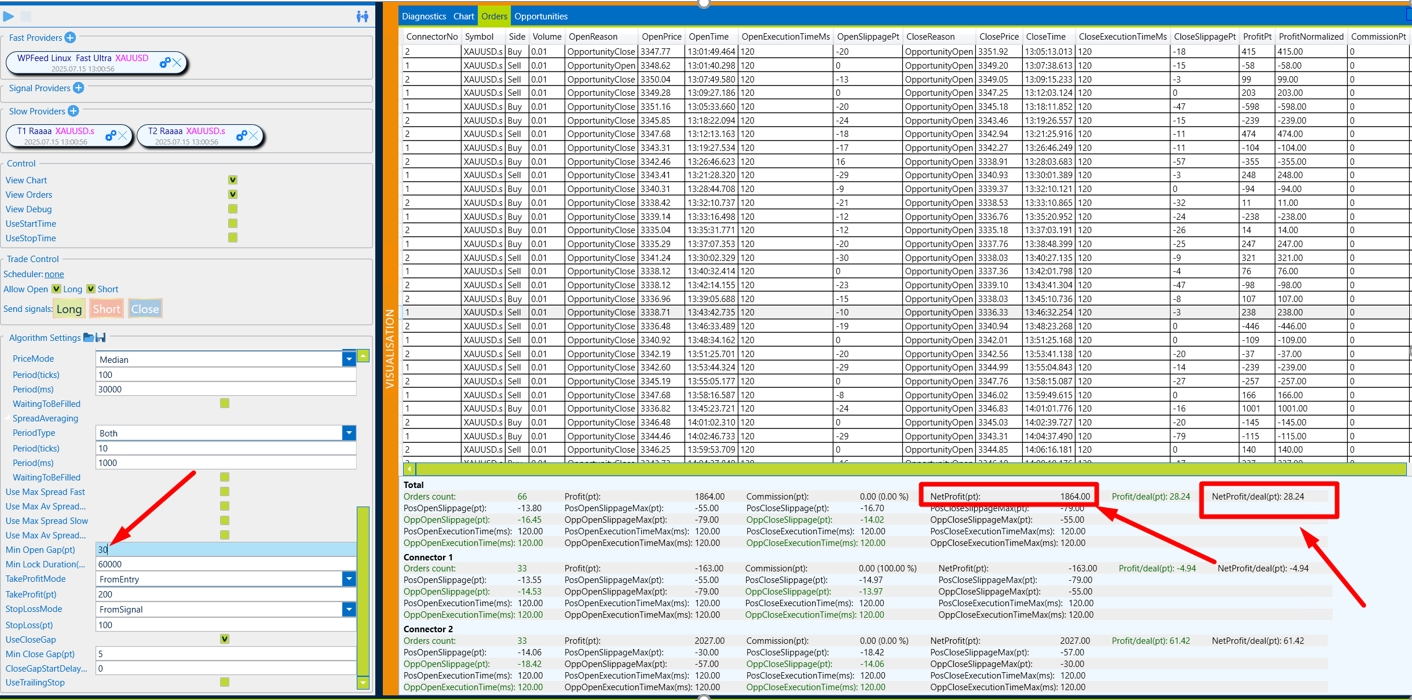
We see that in just 2 steps of the Backtest, we increased the profit from 7p per trade to 28p, i.e. the profit margin of the strategy became 4 times better.
After 20 minutes of the test, the perfect set appeared for the recorded quotes.
Check the quality and reliability of the signal in the Chart column.
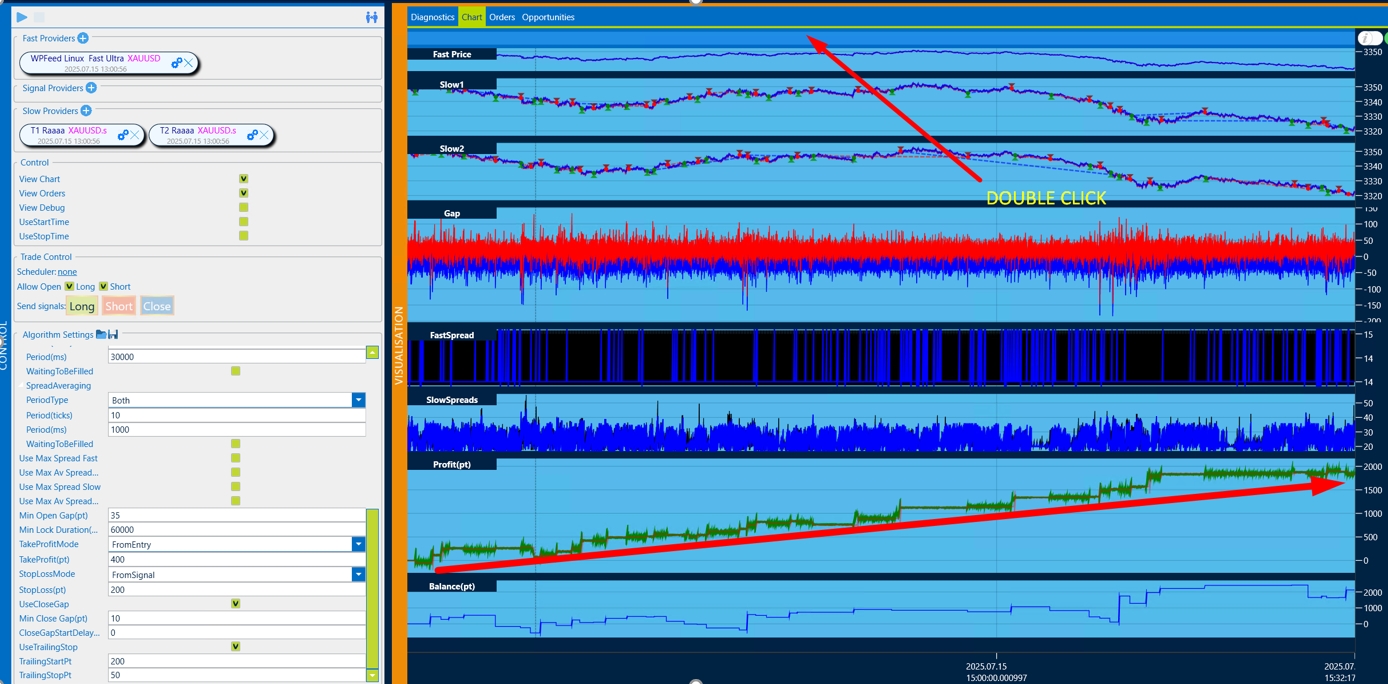
We recommend the following configuration sequence:
- Open Gap – we find the biggest profit per trade and total profit.
- CloseGap – Just like with the opening of Gap, we are looking for the most profitable setup.
- TakeProfit/StopLoss – There are many options here, it is necessary to painstakingly search for the ideal option.
- TrailStart-TrailStop.
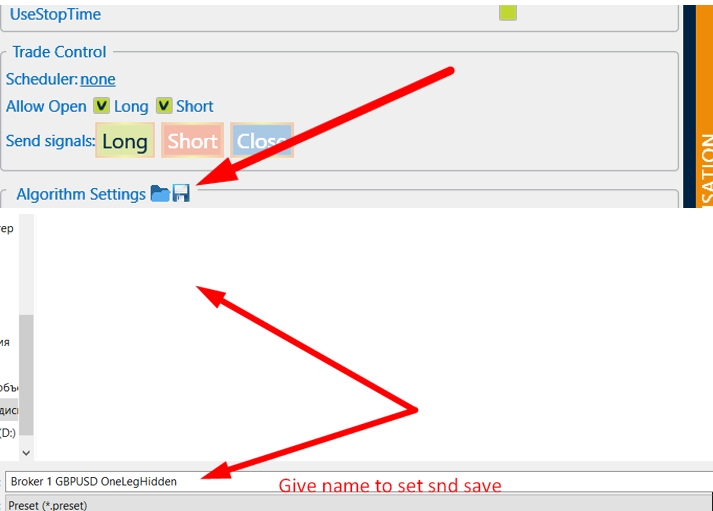
After you have found the most profitable set, you need to write it down.
Pay attention to the gap size on the broker you want to trade on. We recommend setting the gep size not less than the spread size.
Also note that there is a lot of volatility on big trading news and the spread widens very much on a slow broker. Limit it and you will protect your trading from unnecessary risks.
You must understand that it takes patience and painstaking work to create a set. Record several days of quotes and when creating a set on one day, test it on other days as well. If you see that the profit is very small or the trade is not stable, change the broker.
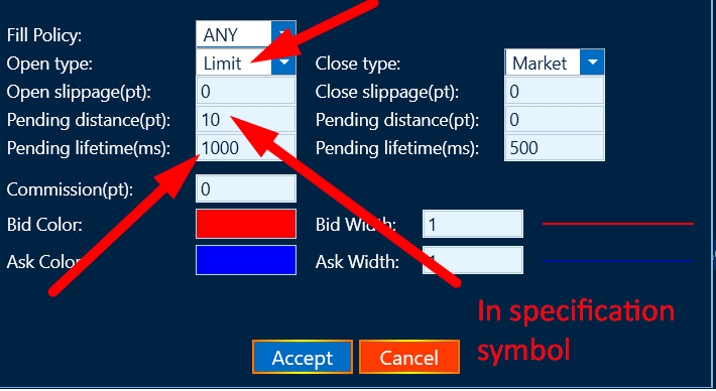
Please note that the software allows you to trade in the limit order mode (for maximum trade concealment, but it is not suitable for all brokers – pay attention to the size of Stop orders in the symbol specification). The lifetime of a limit order is also important. We recommend setting 1000ms.
Limit order testing is not available in the Backtest yet. To trade limit orders, change the order type from Market to Limit
Basic configuration of the strategy
Input data
Parameter Description AllowTradeOpen allow opening orders Digits the number of decimal places in quotes SessionControl InitialBalancePt – Specify the initial deposit UseEmergencyClose – Specify the initial deposit
UseMaximumDrawDown (MaximumDrawdown) – the amount of loss on the strategy in % of the initial deposit at which the software will stop trading.
ExecutionControl If enabled: Treshold(ms) – the exucution time is acceptable for your setup
MaxExecution Count Above Treshold – The number of allowed exceedances before trading stops.
Max Consecutive Execution Count Above – The allowed number of consecutive increases in the threshold before trading stops.
SlippageControlPt If enabled: SlippageControlPt – Acceptable size of the slip
MaxExecution Count Above Treshold – The number of allowed exceedances before trading stops.
Max Consecutive Execution Count Above – The allowed number of consecutive increases in the threshold before trading stops.
Volume1 the volume of the opened transaction on the first slow broker Volume2 the volume of the opened transaction on the second slow broker UseMixer If enabled: Hedging is possible not only on different brokers, but also on one (Buy/sell)
If not Enabled:
There will be no counter orders on the same broker.
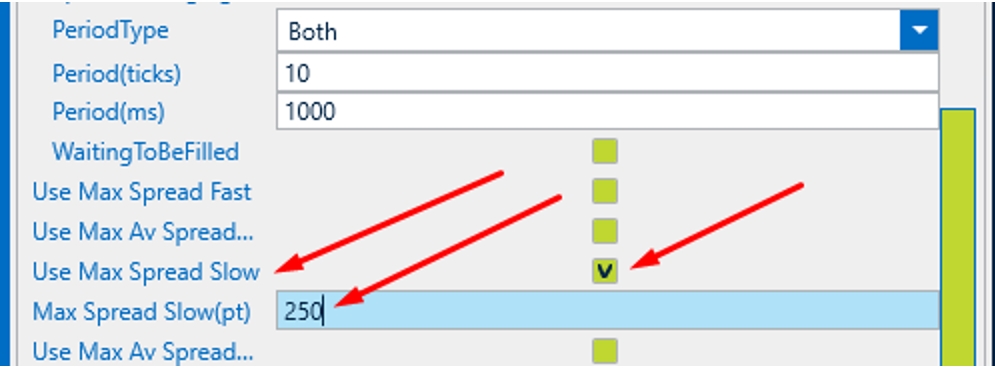
UseAutoShift use automatic alignment of quotes between fast and slow broker. AutoShiftPeriod averaging period for automatic alignment of quotes ManualShiftBidPt the number of points to shift the Bid price of a fast broker ManualShiftAskPt the number of points to shift the Ask price of a fast broker MinSpreadFastPt minimum spread in points on a fast broker at which a deal can be opened UseMaxSpreadFast use the maximum spread filter on a fast broker MaxSpreadFastPt the value of the maximum spread filter in points on a fast broker, at which a deal can be opened MinSpreadSlowPt the minimum spread in points on a slow broker at which a deal can be opened UseMaxSpreadSlow use the maximum spread filter on a fast broker MaxSpreadSlowPt the value of the maximum spread filter in points on a slow broker, at which a deal can be opened MinOpenGapPt minimum gap in points for opening a deal on a slow broker FastTickDirectionConfirmation entry only if the direction of the last tick on the fast broker coincides with the direction of the transaction TakeProfitPt take profit in points -From Entry – the profit calculation is based on the opening price of the transact ion
-From Signal – The profit calculation is based on the price that was at the beginning of the signal.
StopLossPt stop loss in points -From Entry – the StopLoss profit calculation is based on the opening price of the transact ion
-From Signal – The StopLoss calculation is based on the price that was at the beginning of the signal.
MinLockDurationMs minimum bow holding time in milliseconds UseCloseGap If enabled: The size of the reverse Gap for closing the transaction.
UseTralingStop If enabled: TralingStartPt – The amount of profit from which traling is enabled
TralingStopPt – The Traling step that the level will move to.
We recommend starting trading on real accounts only after carefully selected sets, taking into account the slippage in the tests.
-
This reply was modified 4 months, 3 weeks ago by Admin.
-
This reply was modified 4 months, 3 weeks ago by Admin.
-
This reply was modified 4 months, 3 weeks ago by Admin.
-
This reply was modified 4 months, 3 weeks ago by Admin.
-
This reply was modified 4 months, 3 weeks ago by Admin.
-
This reply was modified 4 months, 3 weeks ago by Admin.
-
This reply was modified 4 months, 3 weeks ago by Admin.
AdminKeymaster4 months, 3 weeks ago in reply to: One Leg Multi Algo #5396🔹 OneLegMulti Algorithm: Technical Overview

OneLegMulti is a one-sided arbitrage strategy implemented in the Westernpips Private 7 platform. It is designed to enter trades in a single direction (Buy or Sell) based on the price divergence between Fast and Slow (or Signal) quote providers. The strategy evaluates gaps between quotes, applies spread filters, calculates take profit and stop loss levels, and manages trade exits with trailing and reverse-gap logic.
________________________________________⚙️ Core Logic
1. Signal Generation
• The strategy receives live quotes from multiple Fast, Slow, and Signal feeds.
• “Shifted” prices (ShiftedFastBid / ShiftedFastAsk) are calculated using the AutoShifter component, which applies both manual and automatic price alignment.
• Gaps are calculated between Fast and Slow/Signal providers for both Buy and Sell directions.
• A trade signal is created when the gap exceeds the defined threshold (MinOpenGapPt) and all spread filters are satisfied.2. Entry Conditions
A position is opened only when:
• The current and average spreads for Fast and Slow providers are below the user-defined limits.
• A minimum time (WaitBeforeNewSlotEntryMs) has passed since the last signal.
• Trade direction (Long/Short) is allowed by configuration.
• If the above conditions are met, a trade is initialized with a signal price, take profit, and stop loss.3. Exit Conditions
A trade is closed if:
• The take profit or stop loss is hit based on Slow provider quotes.
• If Trailing Stop is enabled, the stop level is dynamically updated when profit exceeds TrailingStartPt.
• TakeProfitMode and StopLossMode determine whether the distance is calculated from the signal price or the actual entry price.
• If Close Gap is enabled, the trade will also close if an opposite gap appears — e.g., a Sell signal will be closed if a strong Buy gap forms in the Fast feed.
• Closure is allowed only when spread thresholds are not violated at the moment of exit.
________________________________________🔍 Key Features
• Multi-Slot Execution
Supports parallel signal processing via multiple slots (SlotsCount). Each slot independently tracks its own trade state.
• Spread Averaging
Uses an Averager component to smooth real-time spread data, preventing false signals due to quote noise.
• AutoShifter
Aligns price data between Fast and Slow/Signal providers by applying time-based and manual shift settings.
• Trailing Stop Logic
Dynamically adjusts the stop loss after a certain profit threshold is reached, maintaining profits in volatile conditions.
• Dynamic Volume
If enabled, the strategy calculates lot size automatically based on balance and the DynamicVolumeEquityDivider parameter.
________________________________________🧪 Practical Use Case
• Fast and Slow brokers are configured and streaming data.
• The strategy monitors all incoming ticks in real time.
• When a gap between Fast and Slow exceeds the set threshold, and spreads are within limits, a position is opened.
• Stop Loss and Take Profit are placed based on signal or entry price, depending on configuration.
• The trade is monitored until closed by TP, SL, trailing stop, or reverse gap logic.
• The strategy ensures no new entries are triggered too quickly by enforcing a cooldown between signals.
________________________________________✅ Purpose
OneLegMulti is a latency arbitrage strategy optimized for one-direction execution using quote divergence between providers. It is ideal for exploiting micro-opportunities where the Fast feed temporarily outpaces the Slow feed — without requiring a hedge on the opposite side. The strategy offers fine control over entry, risk, execution filters, and exit behavior, making it suitable for stealthy and efficient arbitrage.
AdminKeymaster5 months ago in reply to: Possible failures of Fast Feed Linux with servers from Vultr.com #5356Decision:
1. Simultaneously press the Win + R key:
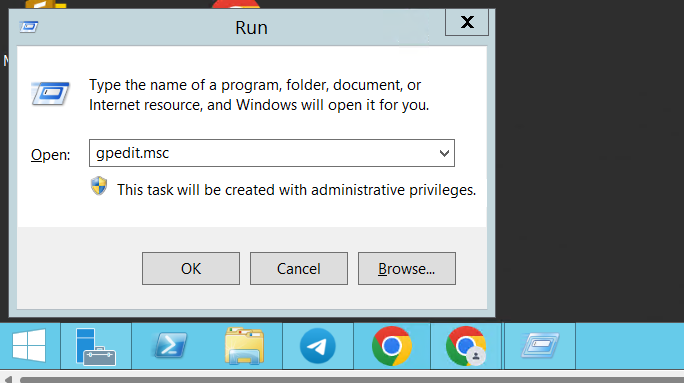
2. In the OPEN line, enter the value “gpedit.msc” and press OK
3. You will see a window like this:
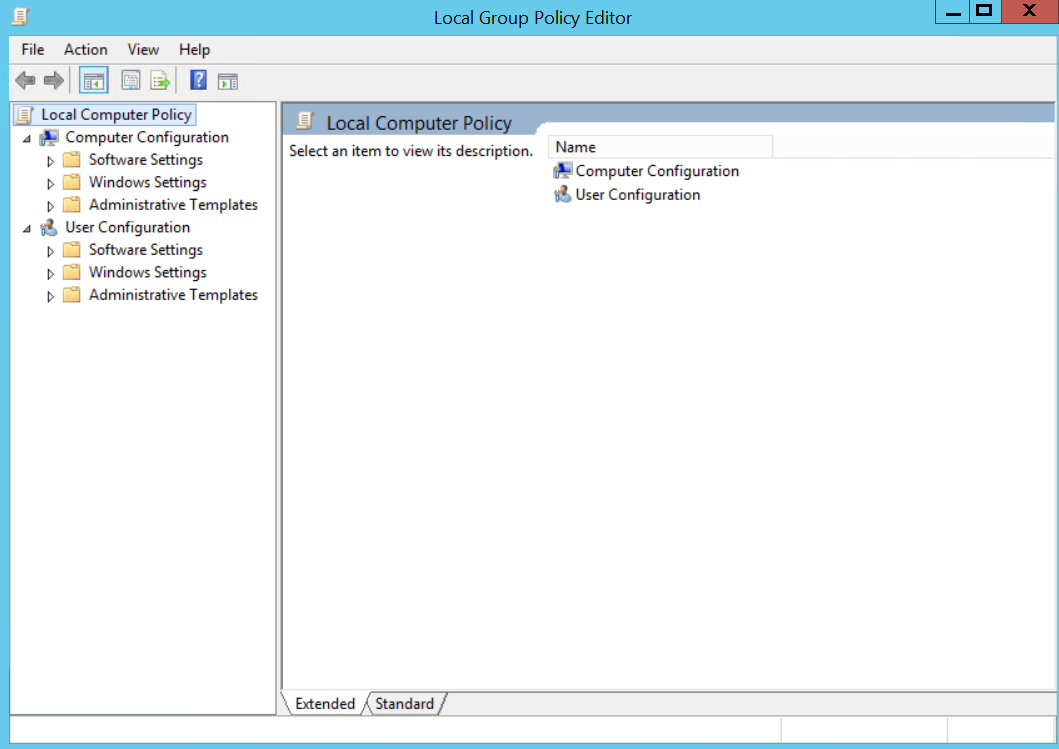
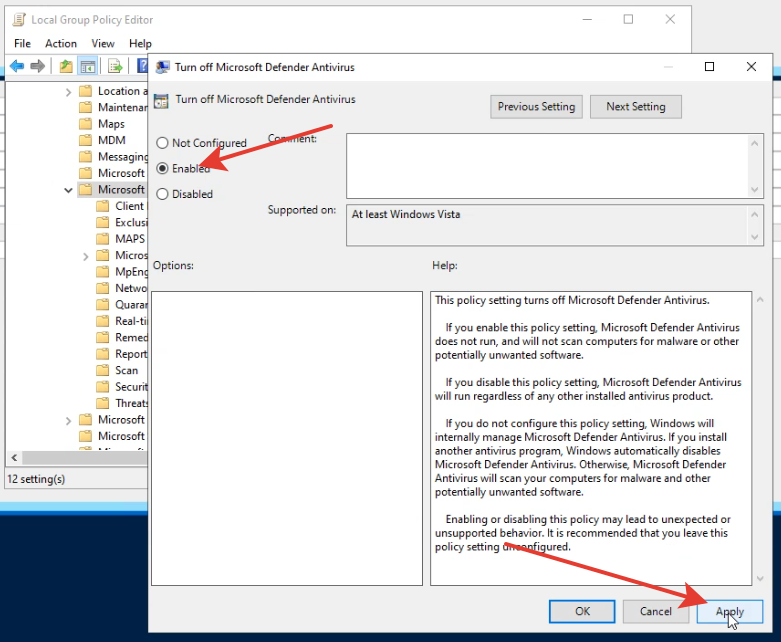
4. Turn off Microsoft Defender Antivirus (if available)
We are following this path:
Computer Configuration – Administrative Templates – Windows Components – Microsoft Defender Antivirus – “Click” on Turn off Microsoft Defender Antivirus: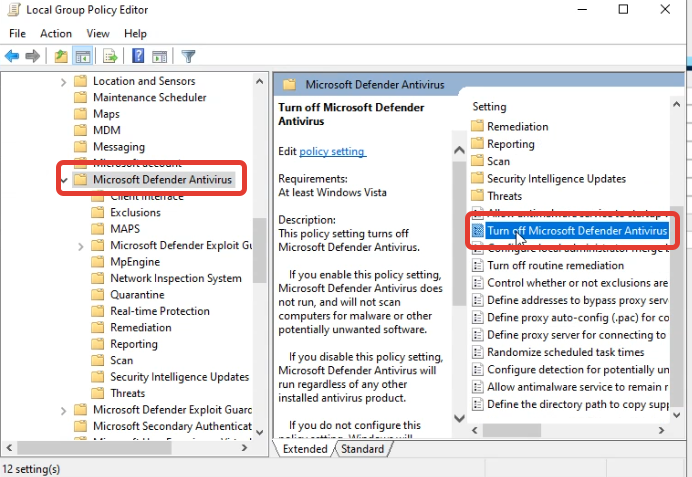
5. Press Enabled + Apply + Ok
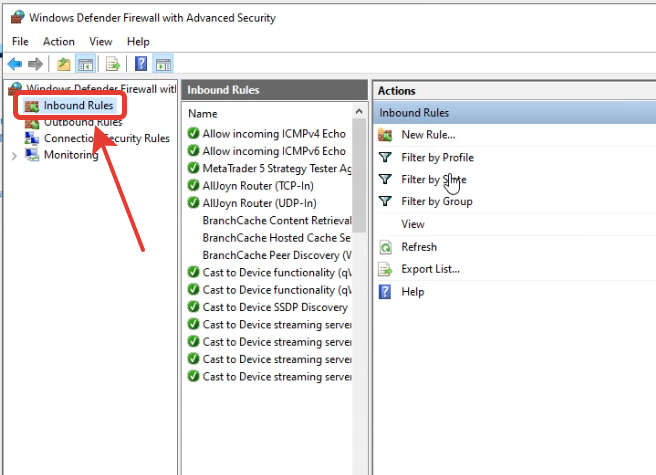
6. Open All Control Panel ltems:

7. Press Windows Defender Firewall:
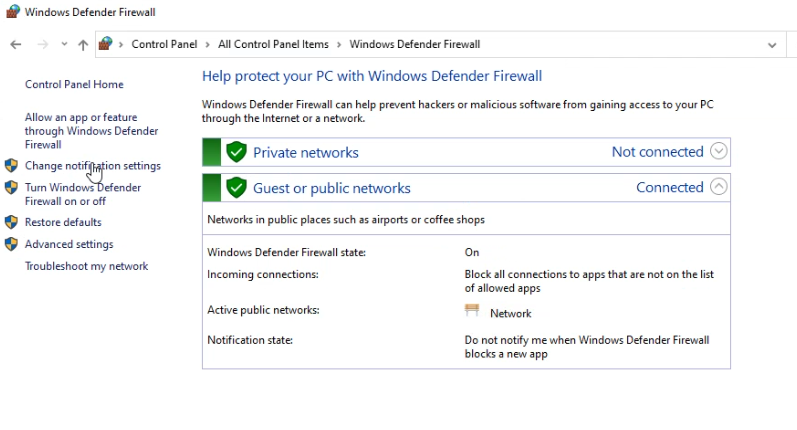
8. Click on Advanced Settings:
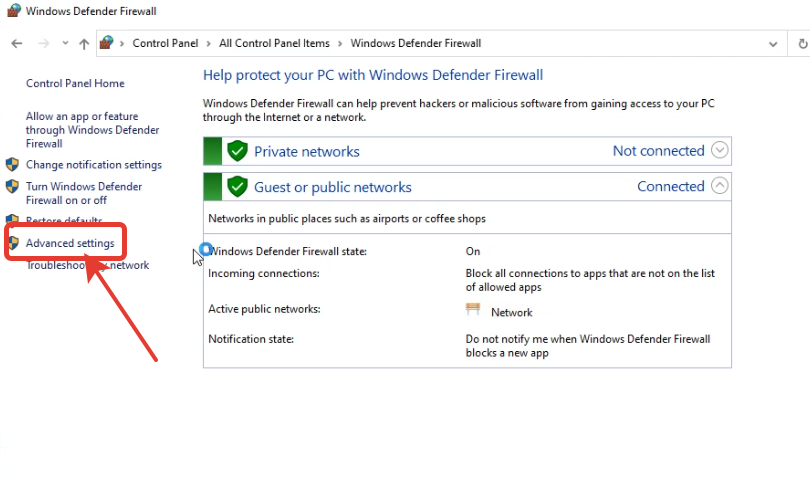
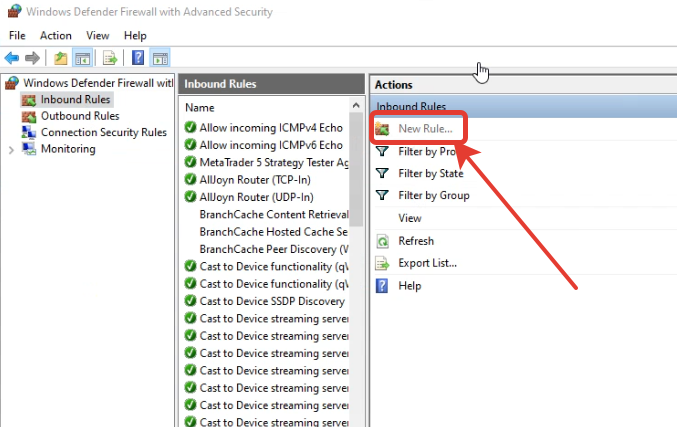
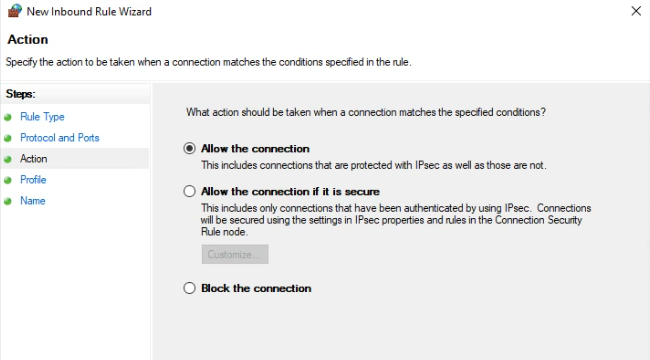
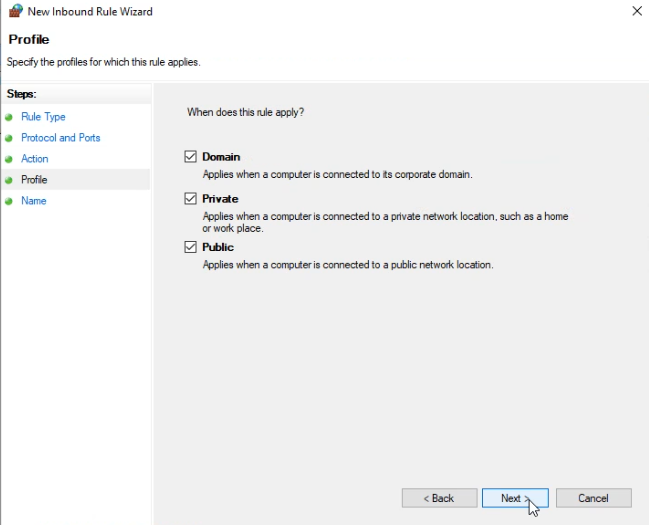
9. A window opens in which you need to click on the “Inbound Rules”:
10. Next, click on the New Rule…
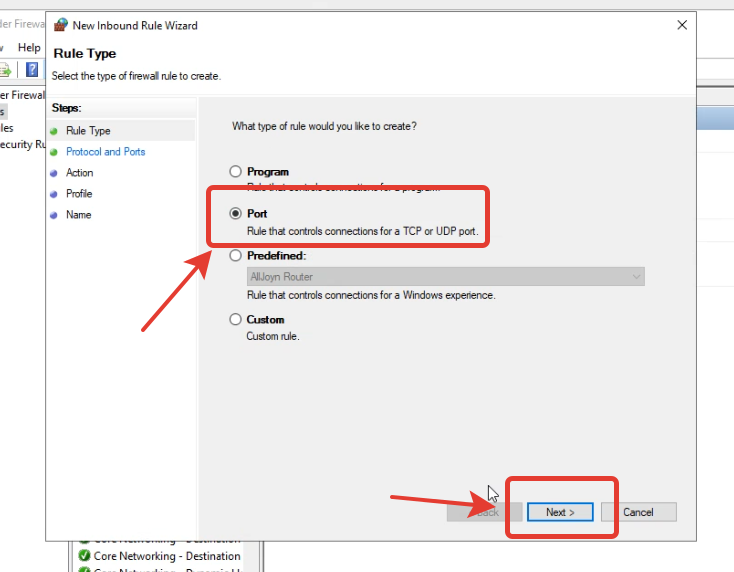
11. In the window that opens, select “Port” and then “Next”:
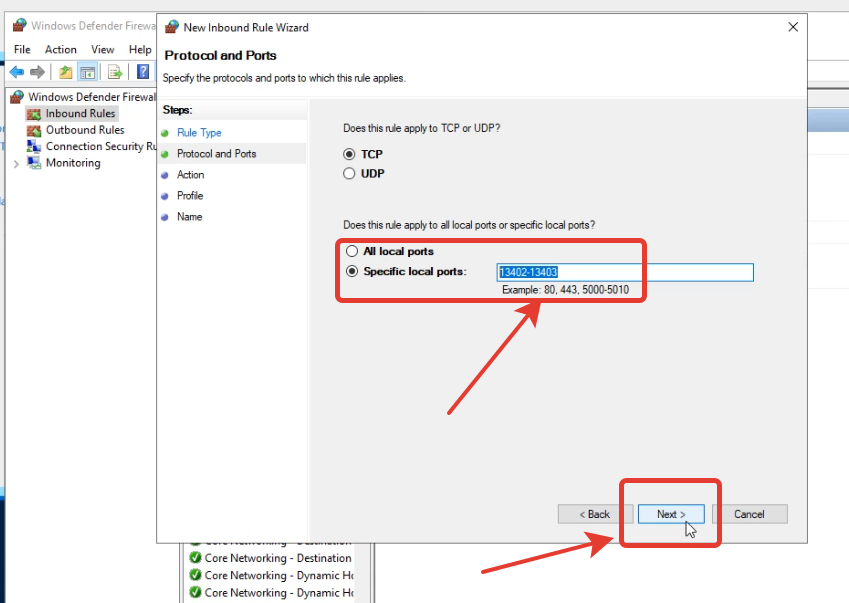
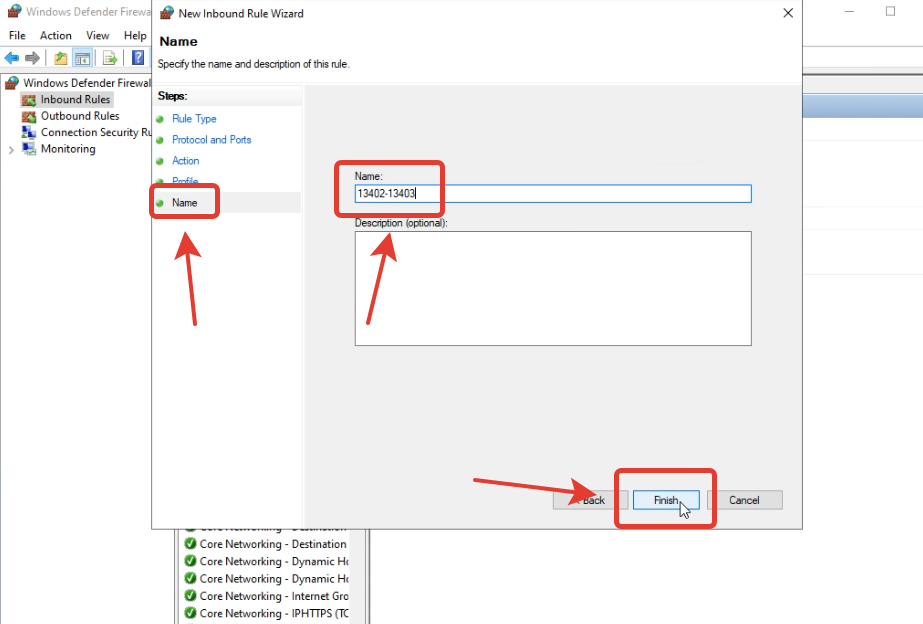
12. In the window that opens, select the “Specific local Ports” section. Enter data 13402-13403 and copy this value (ctrl + C)
13. Don’t change anything in the Action + Profile sections. In the “Name” section, paste the copied 13402-13403 and click Finish:
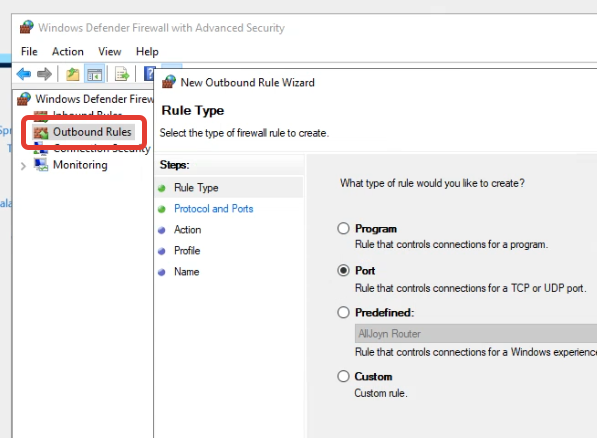
14. The same procedure with the same data as in paragraphs 9 to 13 in the “Outbound Rules” section:
-
This reply was modified 5 months ago by Admin.
-
This reply was modified 5 months ago by Admin.
-
This reply was modified 5 months ago by Admin.
-
This reply was modified 5 months ago by Admin.
-
This reply was modified 5 months ago by Admin.
-
This reply was modified 5 months ago by Admin.
-
This reply was modified 5 months ago by Admin.
-
This reply was modified 5 months ago by Admin.
-
This reply was modified 5 months ago by Admin.
-
This reply was modified 5 months ago by Admin.
AdminKeymaster5 months, 2 weeks ago in reply to: How to Check Ping to Broker Servers #4275Perhaps one of the most important things that a person involved in arbitrage trading should know is to specify the correct server in the trading software and determine the ping to the broker.
1. The first method. The easiest way to see the ping to the broker is to click on the ping icon in the MT5 or MT4 terminal.
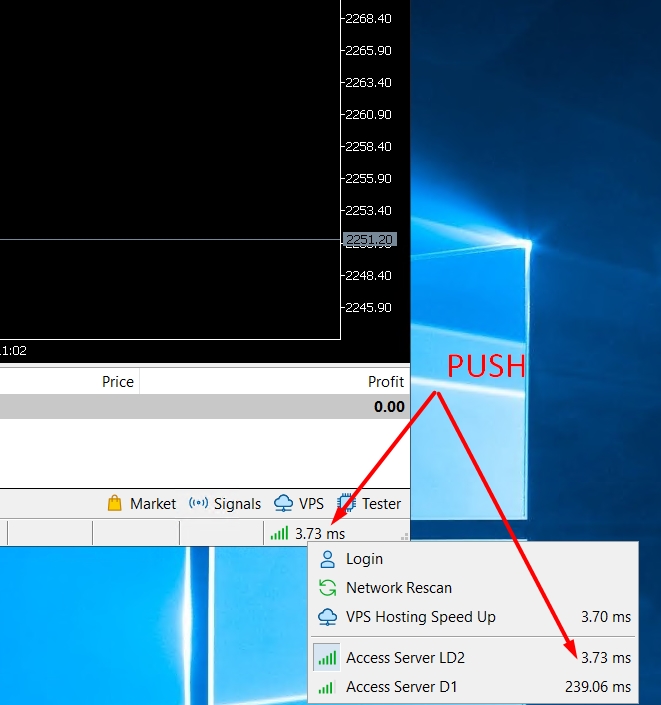
We see that the nearest server has the name Access Server LD2. To install this particular server in our software, we follow the path File-Open Data Folder – Config- server.dat.
It is this file that will display all available servers. Therefore, we insert a copy of this file already in the software.
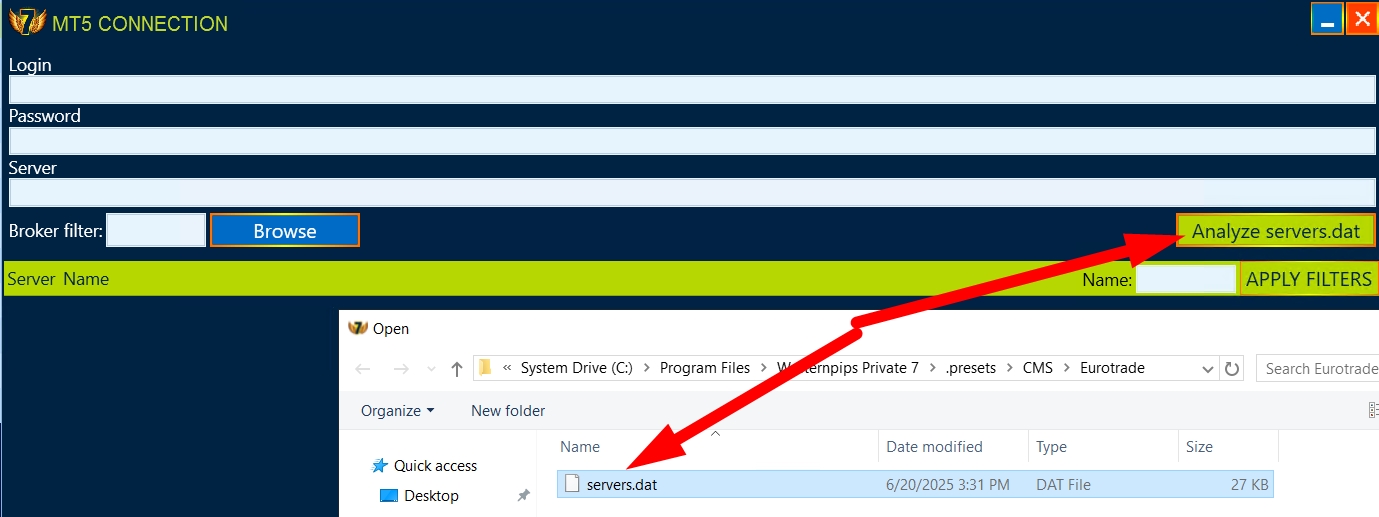
Copy it to an open folder https://prnt.sc/vnNXTXVFhKwH and push open
We will see the list of servers and open Access server LD2.
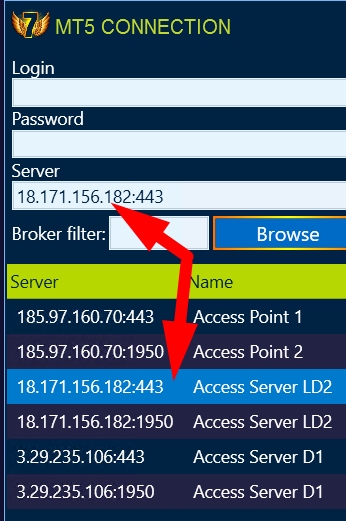
Thus, we have established the fastest possible connection with the broker in the software.2. The second method – this is to copy the entire IP of the broker’s server from the software. Press WIN+R, type cmd, and in the command line, write ping “our IP” without any bugs.

Press enter and you will see the ping time to this broker server.
Please note that this method does not guarantee receiving ping data. There are servers that do not respond to this procedure. Therefore, we recommend using the first method.-
This reply was modified 5 months, 2 weeks ago by Admin.
-
This reply was modified 5 months, 2 weeks ago by Admin.
-
This reply was modified 5 months, 2 weeks ago by Admin.
-
This reply was modified 5 months, 2 weeks ago by Admin.
-
This reply was modified 5 months, 2 weeks ago by Admin.
-
This reply was modified 5 months, 2 weeks ago by Admin.
-
This reply was modified 5 months, 2 weeks ago by Admin.
-
This reply was modified 5 months, 2 weeks ago by Admin.
-
This reply was modified 5 months, 2 weeks ago by Admin.
-
This reply was modified 5 months, 2 weeks ago by Admin.
-
This reply was modified 5 months, 2 weeks ago by Admin.
-
This reply was modified 5 months, 2 weeks ago by Admin.
-
This reply was modified 5 months, 2 weeks ago by Admin.
-
This reply was modified 5 months, 2 weeks ago by Admin.
Attachments:
You must be logged in to view attached files.AdminKeymaster5 months, 2 weeks ago in reply to: How to Change IP (if i change VPS) in WP7 #4159Task: Change IP (if i change VPS) in WP7
Decision:
1. Install the latest version of Privat 7 via WAC
2. Launch and enter your current ID (This is your email)
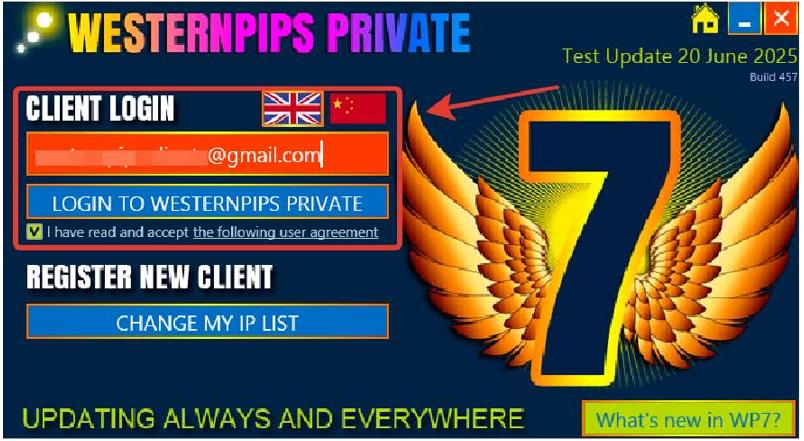
3. Click on “Change My IP List”
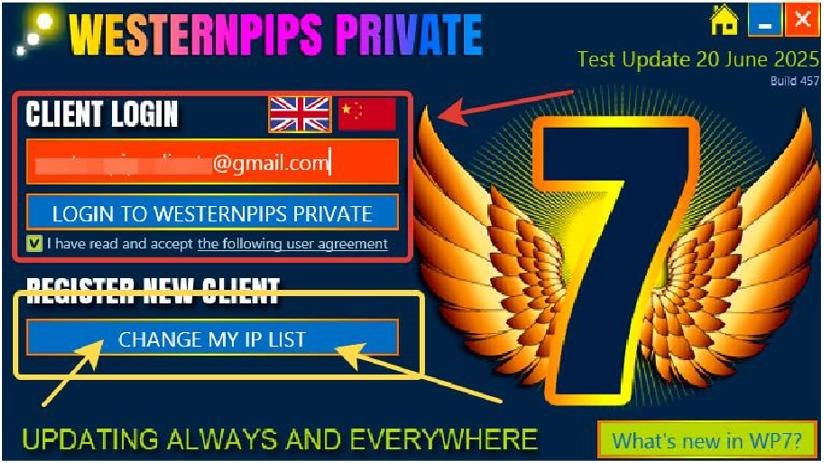
4. You will see a form for editing the IP address change.

5. In this form, you will see your current login ID and address in this format: 255.255.255.255
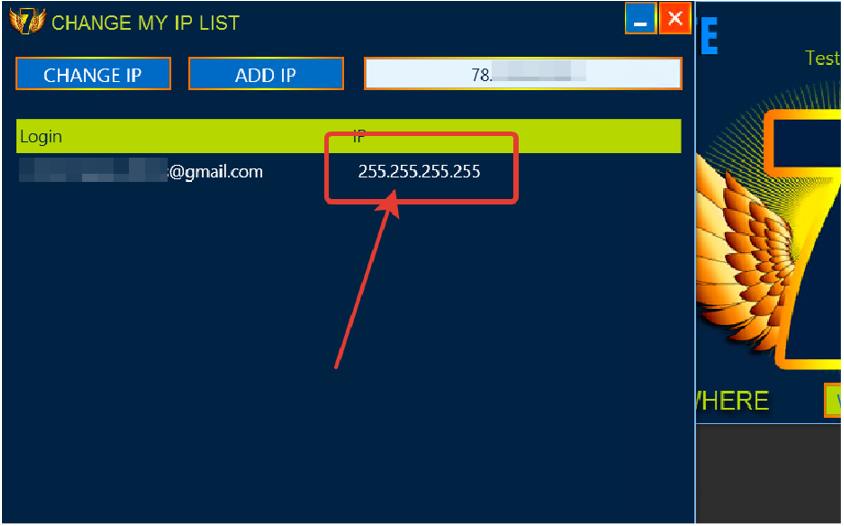
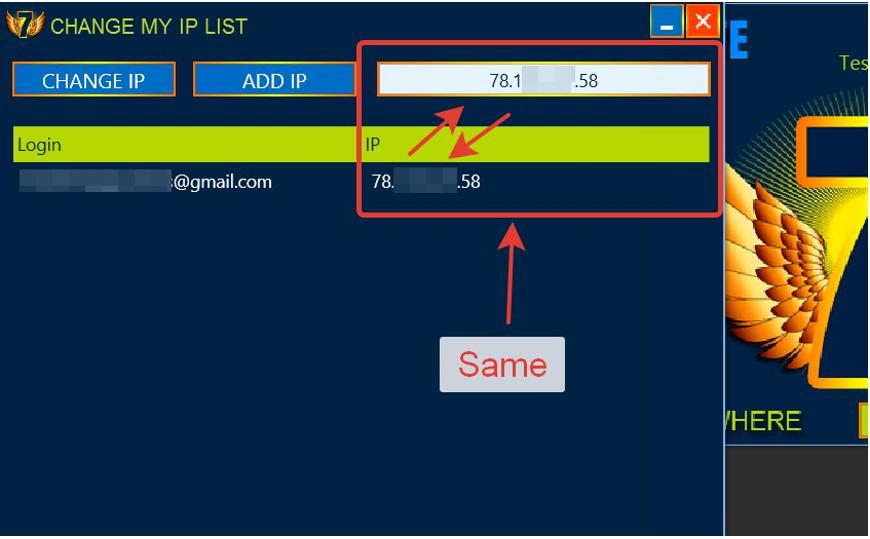
6. In the upper right corner (white field) you will see your IP address of your new VPS server.
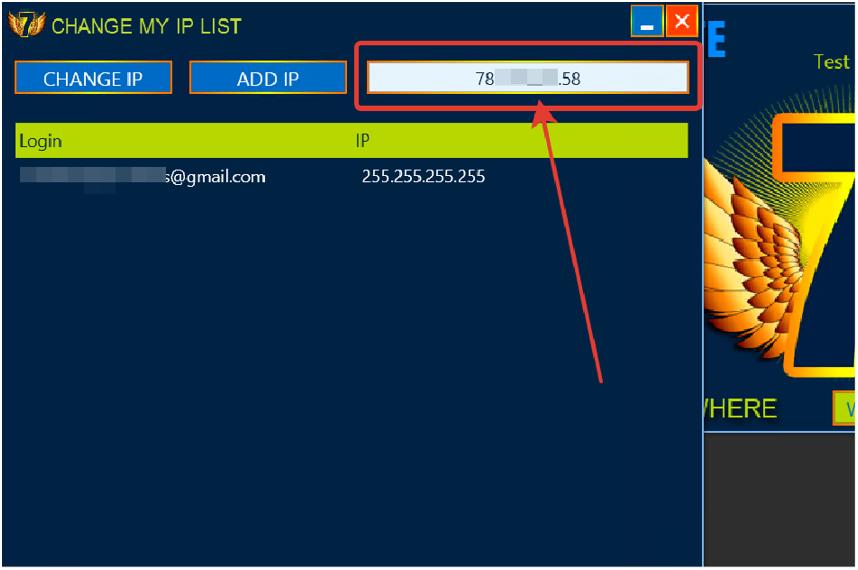
7. Click on your email and highlight the line and Press “Change IP”
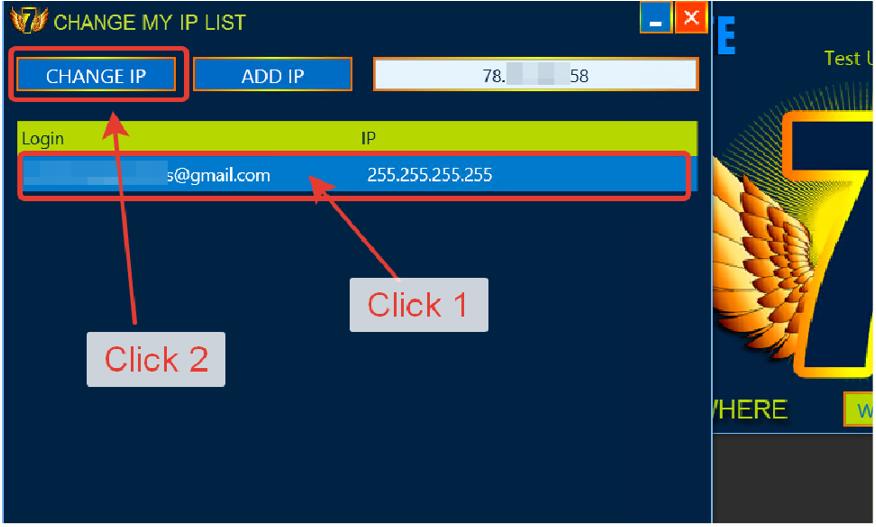
8. Now you have the IP (white field) and the line of your email ID match and you can work.
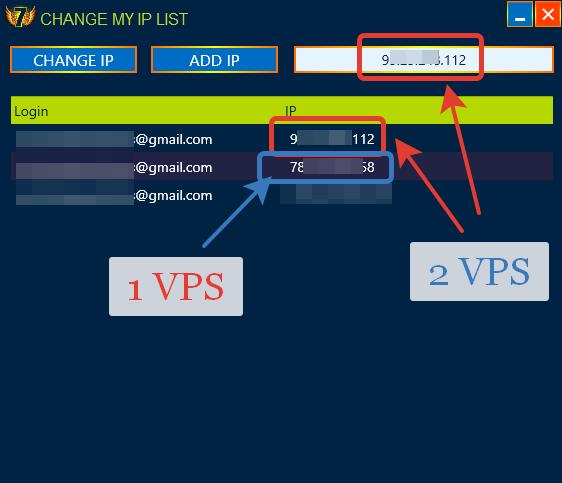
9. If you have 2 licenses, then you need to follow the points:
10. Install Privat 7 on the second VPS server. In the upper right corner (white field) you will see the server’s IP address.
11. Click on ADD IP and you will have a list with your two IP addresses:
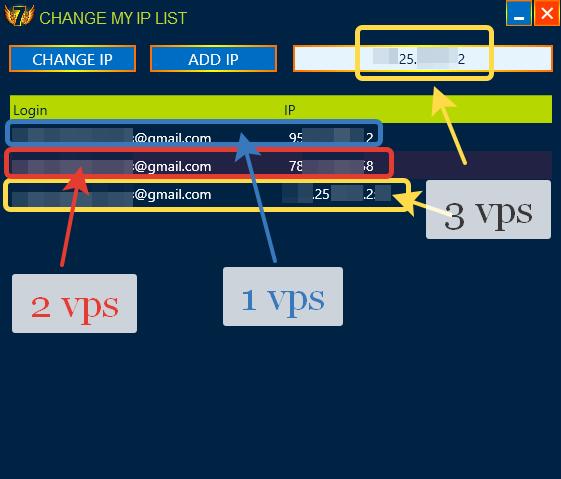
12. If you have three or more licenses, then install Privat 7 on the third, fourth, and so on VPS server. In the upper-right corner (white field), you will see the IP address of your new server every time:
Be sure to remember
1. You need to register the IP address each time on a new VPS server
2. You do not need to try to register all the IP addresses of your VPS servers while on one of them.
-
This reply was modified 5 months, 2 weeks ago by Admin.
-
This reply was modified 5 months, 2 weeks ago by Admin.
-
This reply was modified 5 months, 2 weeks ago by Admin.
-
This reply was modified 5 months, 2 weeks ago by Admin.
-
This reply was modified 5 months, 2 weeks ago by Admin.
-
This reply was modified 5 months, 2 weeks ago by Admin.
-
This reply was modified 2 months, 4 weeks ago by Admin.
Attachments:
You must be logged in to view attached files. -
This reply was modified 3 months, 2 weeks ago by